Lesson 5 of 7 / HQ fundamentals
Onboard a Team Member with /new-hire
Invite a teammate, choose least-privilege role and resource access, prepare a starter package, and verify the recipient's first HQ session.
Begin lesson- Complete in
- 8–10 minutes
- Written path
- 11 steps
You will send a reviewed invitation and give the teammate only the role, knowledge, credentials, and next steps needed to begin work.
Recorded walkthrough
Watch the complete path.
Follow the recording once, then use the written steps below as the durable checklist. English captions are available from the player controls.
This walkthrough uses demo data and shows the complete recorded workflow. Use the written steps below as your durable checklist while you follow along.
Before You Begin
A cloud-backed HQ company already exists.
You are authorized to invite teammates and grant company resources.
You know the teammate's business function and have their work email ready for the private prompt.
You can review the proposed access bundle before sending the invitation.
Step-by-step walkthrough
- Step 1
Start the new-hire flow
Run the command with the teammate's name so HQ can check the roster and begin a new invitation.
CommandRun exactly as shown/new-hire [teammate name]Expected resultHQ checks the company roster and opens the teammate onboarding flow.

Figure 5.1 Start a new-hire flow from the HQ composer.
- Step 2
Resolve identity ambiguity
If HQ finds a similar existing person, confirm whether your target is that person or a genuinely new teammate.
Expected resultHQ stops targeting the existing roster entry and continues with the correct new teammate.
- Step 3
Choose the least-privilege role
Select Member or Admin according to the teammate's responsibilities. Reserve Owner for people who truly need complete company control.
SelectionChoose in the interfaceSelect Member or Admin after reviewing responsibilitiesExpected resultThe invitation carries the lowest role that still supports the teammate's job.
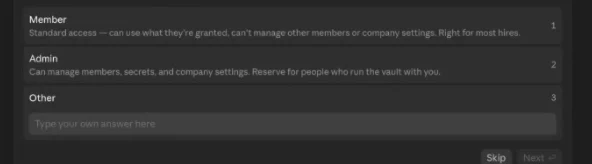
Figure 5.3 Choose Member or Admin based on the teammate's responsibilities.
- Step 4
Enter the business function
Describe the teammate's function in a short label so HQ can recommend relevant access.
PromptSend in your AI sessionEnter [business function]Expected resultHQ has a functional label for building the onboarding bundle.
- Step 5
Choose an access strategy
Select whether to mirror a trusted teammate, use a functional baseline, or specify each grant manually. Review the result whichever path you choose.
SelectionChoose in the interfaceSelect Baseline for this functionExpected resultHQ proposes role-appropriate credentials, knowledge, and onboarding context.
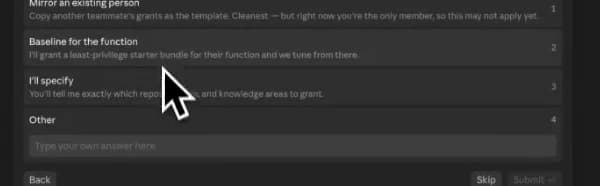
Figure 5.5 Choose a functional baseline or another grant strategy.
- Step 6
Review the bundle and send the invite
Check every proposed grant, enter the teammate's work email only in the private prompt, confirm the invitation, and request a starter package.
PromptSend in your AI sessionReview the proposed access bundleEnter [work email] privately and confirmCreate a welcome package for [teammate name].Expected resultHQ sends the reviewed invitation and begins building the onboarding package.
- Step 7
Verify the operator-side result
Read the completion summary and confirm the invitation, assigned resources, starter package, and onboarding message are ready.
Expected resultThe operator side shows a complete, reviewed onboarding package without revealing private values.
- Step 8
Accept from the recipient account
On the teammate's account, open the HQ invitation and accept it.
NavigationOpen this destinationOpen the private HQ invitation and acceptExpected resultThe teammate joins the company and sees only the resources assigned to them.
- Step 9
Start the recipient's first session
From the teammate's HQ installation, scope a fresh session to the company and briefly introduce the work.
CommandRun exactly as shown/startwork awesomecoHi, I'm getting started with awesomeco.Expected resultHQ binds the session to the company and loads the teammate's authorized shared context.
- Step 10
Send an HQ DM if useful
Send the prepared onboarding note through HQ so the teammate receives the same next steps in their account.
CommandRun exactly as shown/dm [teammate name] with this messageExpected resultThe onboarding note is delivered between the two HQ accounts.
- Step 11
Verify the recipient's access
On the recipient side, check the role, assigned credential access, shared knowledge, onboarding note, and stated next steps.
Expected resultThe teammate sees the intended role and resources without receiving any raw credential value.
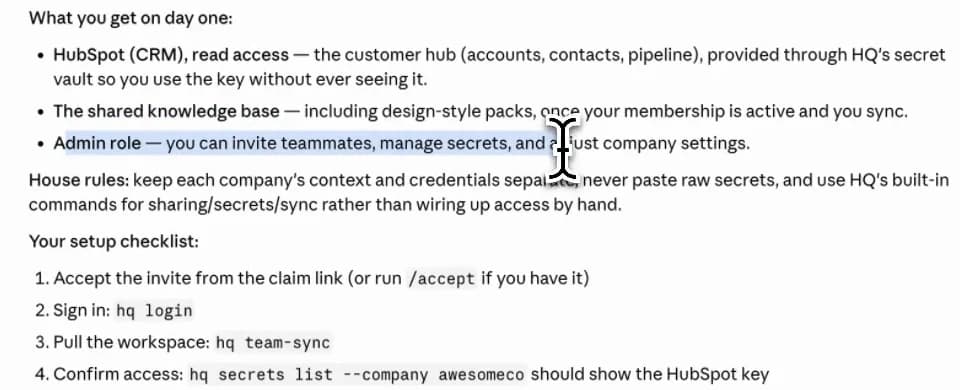
Figure 5.11 The recipient's onboarding note summarizes role, access, and next steps.
Observable finish line
You are done when this is true.
The teammate has accepted the invitation, their role and access match the reviewed bundle, their onboarding note arrived, and their first company-scoped session loads only authorized context.